How to Change an Account Type in Windows 10
8/22/2015
In this article I will describe two methods to change an account type in Windows 10.
There are two account types available in Windows 10 by default: Standard and Administrator.
Standard accounts can use most software and change system settings that don't affect other users or the security of your computer.
Administrators have complete control over the PC. They can change any settings and access all of the files and programs stored on the computer.
Method I. Change an Account Type Using Settings
1. Sign in to Windows 10 using an administrative account.
2. Open Settings and click Accounts.

3. Click Family & other users.

4. Under the Other users section click on the account whose type you want to change.

5. Click Change account type.

6. Select a new account type and click on the OK button.

7. Close the Settings window.
Method II. Change an Account Type Using Control Panel
1. Sign in to Windows 10 using an administrative account.
2. Open Control Panel and click User Accounts.

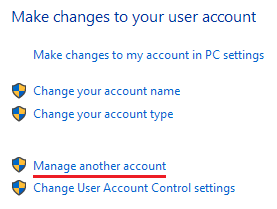
3. To change the type of the account that you are currently using, click Change Your Account Type and go to the fifth step.

To change the type of another user account click Manage another account.

4. Select the account whose type you would like to change and click Change the account type.

5. Set a new type and click Change Account Type.

Note, that at least one user account should have the administrative privileges. Therefore you cannot turn the last administrator into a standard user.

6. Close Control Panel.
More about User Accounts:
- How to Sign in to Windows 10 if All Accounts are Disabled
- How to Rename a User Account in Windows 10
- How to Remove a User Account in Windows 10
- How to Create a User Account in Windows 10
- Administrator User Account in Windows 10
- How to Log on to Windows 10 Automatically
- Add, Change or Remove User Password in Windows 10
